Som standard gör iTunes eller Finder säkerhetskopior av iOS-enheter till en djupt nedgrävd mapp på den interna enheten. Det finns ingen specifik inställning som du kan aktivera och välja en annan plats. Dessa säkerhetskopior kan köras i flera gigabyte. Således, för bättre lagringshantering, kanske du vill ändra din iPhone-säkerhetskopieringsplats på din Mac eller PC. Låt mig visa dig hur du kan flytta standard backup-plats för iOS.
- Ändra iPhone-säkerhetskopieringsplats på Mac som kör macOS Catalina eller senare
- Återställ iPhone-säkerhetskopieringsmapp till sin ursprungliga plats på Mac
- Ändra iTunes Backup-plats med hjälp av iPhone Backup Extractor
- Har du redan ändrat iTunes Backup-platsen men kunde inte se säkerhetskopian?
- Så här ändrar du iTunes iOS Backup-plats på Windows PC
Ändra iPhone-säkerhetskopieringsplats på Mac som kör macOS Catalina eller senare
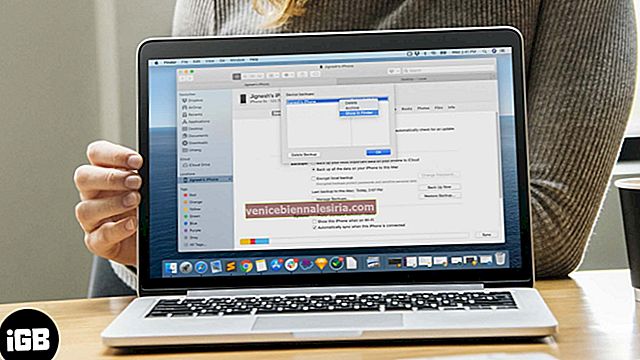
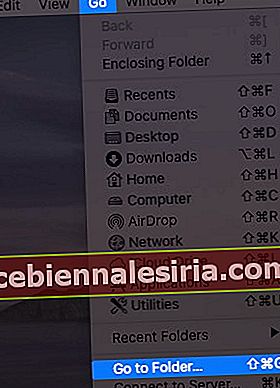
- Klicka på Gå → Gå till mapp i det övre menyraden ... Skriv eller kopiera och klistra in den här exakta adressen ~ / Bibliotek / Applikationssupport / MobileSync.

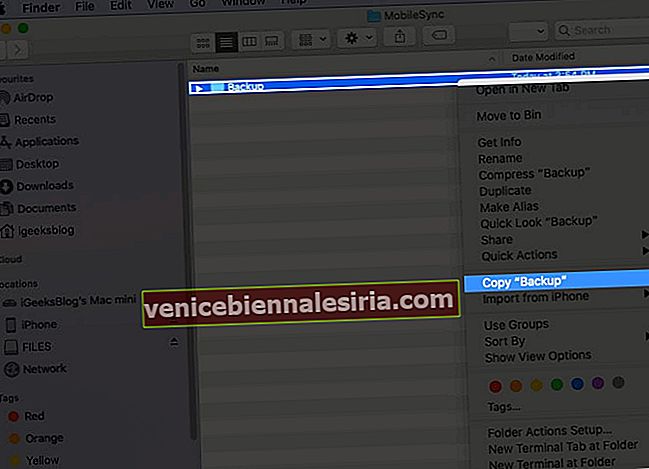
- Du är nu på den plats där din Mac gör säkerhetskopior som standard. Högerklicka på mappen Backup och välj Kopiera "Backup" .
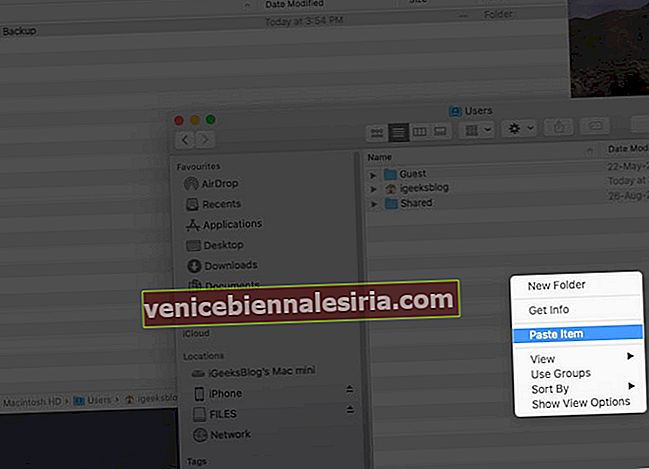
- Nu, (öppna ett andra Finder-fönster och) gå till den plats där du vill ha din nya iPhone-säkerhetskopieringsmapp. Det kan vara skrivbordet, dokument, en ny mapp någonstans. När du är på den platsen högerklickar du och väljer Klistra in objekt . Låt processen för att kopiera den aktuella säkerhetskopieringsmappen till den här nya platsen avslutas. Håll Finder-fönstret öppet. Du kommer att behöva detta i steg 6 nedan.
- Efter kopiering, gå tillbaka till det första Finder-fönstret (~ / Library / Application Support / MobileSync), högerklicka på Backup-mappen och välj Byt namn (eller välj mappen och tryck på Enter-tangenten).
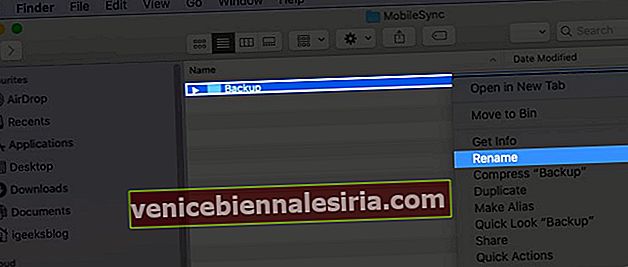 Lägg nu till .old till filnamnet. Som ett resultat kommer det här mappnamnet att se ut som Backup.old
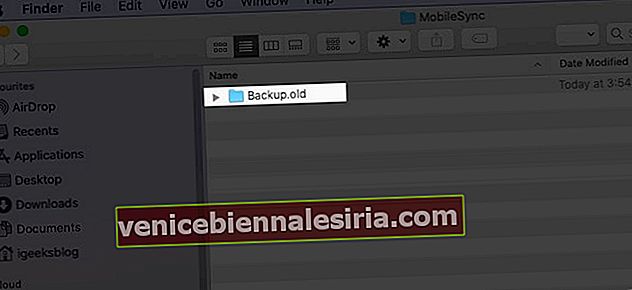
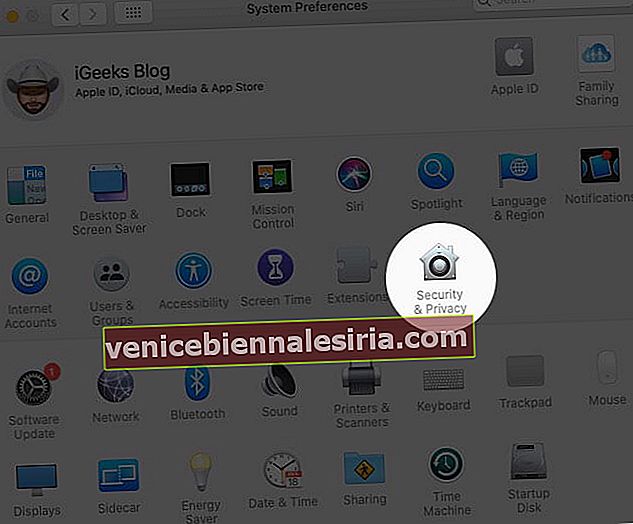
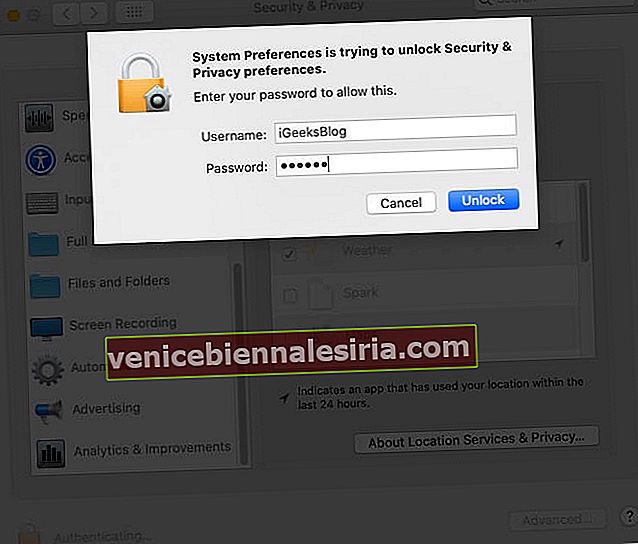
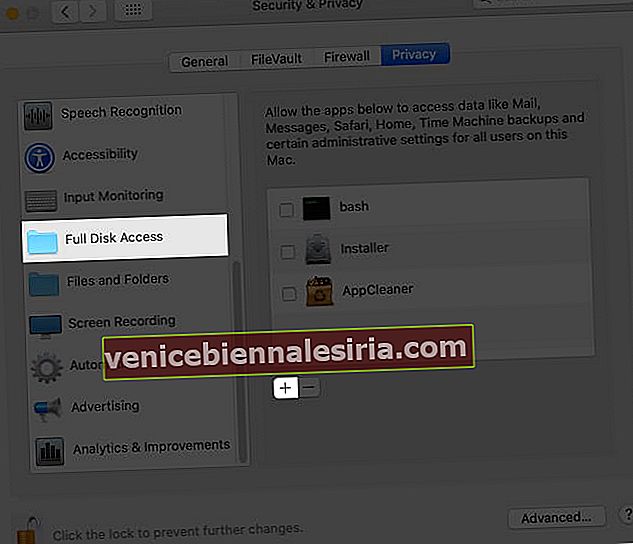
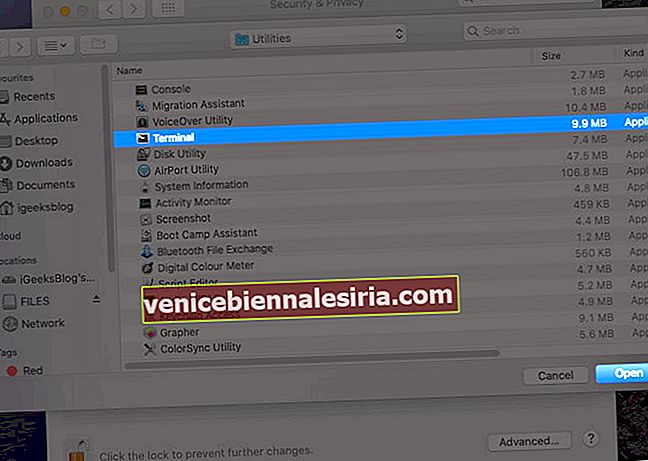
- Klicka på Apple-logotypen → Systeminställningar → Säkerhet och sekretess → fliken Sekretess → klicka på låsikonen och ange ditt Mac-lösenord för att fortsätta. Klicka på Full Disk Access från vänster sidofält → klicka på den lilla plus ( + ) ikonen. Från mappen Application-verktyg → välj Terminal och klicka på Öppna . Efter detta kan du klicka på låsikonen igen och stänga det här fönstret.

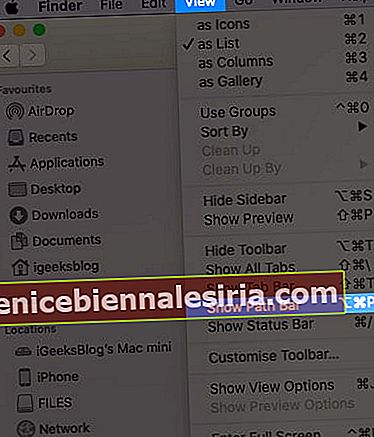
- Nu måste du veta den exakta platsen för den nya säkerhetskopieringsmappen. Klicka på Visa i det övre fältet i Finder-fönstret och välj Visa sökfält . Du ser en tunn rad längst ner som berättar den exakta platsen för den här nya säkerhetskopieringsmappen. Håll det här fönstret öppet.

- Tryck på Kommando + mellanslag , sök efter Terminal och öppna den. Därefter måste du redigera följande kommando för att passa din dator och sedan skriva / klistra in det i terminalfönstret.
ln -s /Volumes/Drive/Backup/ ~/Library/Application\ Support/MobileSync/ - Mycket viktigt: Redigering av kommandot ovan: Öppna en vanlig anteckningsblockapp eller en webbplats som editpad.org. Kopiera nu kommandot ovan och klistra in det där. Därefter måste du ersätta / Volumes / Drive / Backup / med platsen för din Backup-mapp.
Se till exempel skärmdumpen ovan. Platsen för min Backup-mapp är Macintosh HD → Användare → Backup . Så kommandot kommer att se ut:
ln -s /Volumes/Macintosh\ HD/Users/Backup/ ~/Library/Application\ Support/MobileSync/Om ett platsnamn har två eller flera delar / ord som Macintosh HD, måste du sätta ett snedstreck och ett mellanslag. Till exempel Macintosh \ HD
ln -s /Volumes/Donald/Backup/ ~/Library/Application\ Support/MobileSync/ln -s /Volumes/Donald/iPhone/Backup/ ~/Library/Application\ Support/MobileSync/Now, you know how to change the path address in the command. Next, let us make use of it.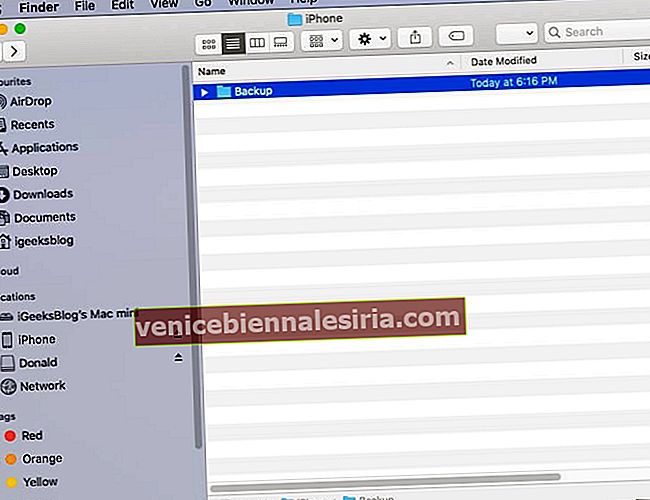
Copy the final command, paste it in the Terminal, and press the enter key.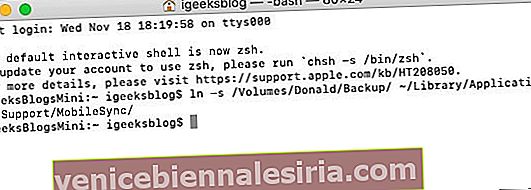 Tip: Now, when you go to the original Backup.old Finder window, you will see a new folder named Backup, which will have a small arrow on it.
Finally, open Finder on your Mac, connect the iPhone, Trust it, and click on Back Up Now. The backup would be made and saved at the new location.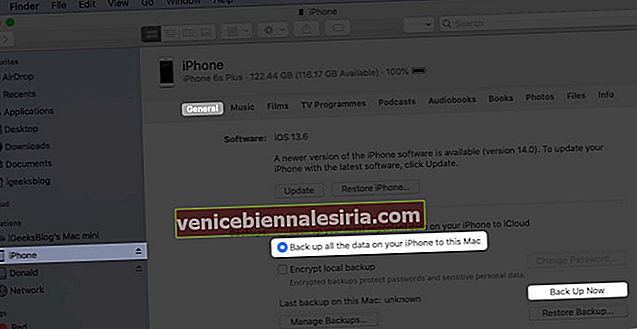


 Lägg nu till .old till filnamnet. Som ett resultat kommer det här mappnamnet att se ut som Backup.old


 Tip: Now, when you go to the original Backup.old Finder window, you will see a new folder named Backup, which will have a small arrow on it.
Notes:
Optional: After you complete the first backup at the new location, you may choose to delete the Backup.old folder. This may free significant space on your Mac.If you opted to back up your iPhone to an external drive, make sure you connect it to the Mac before hitting Back Up Now in the future.
Restore iPhone Backup Folder to its Original Location on Mac
From the Finder window, click on Go → Go to Folder → and enter this location ~/Library/Application Support/MobileSyncRight-click on the folder with an arrow icon and select Move to Bin.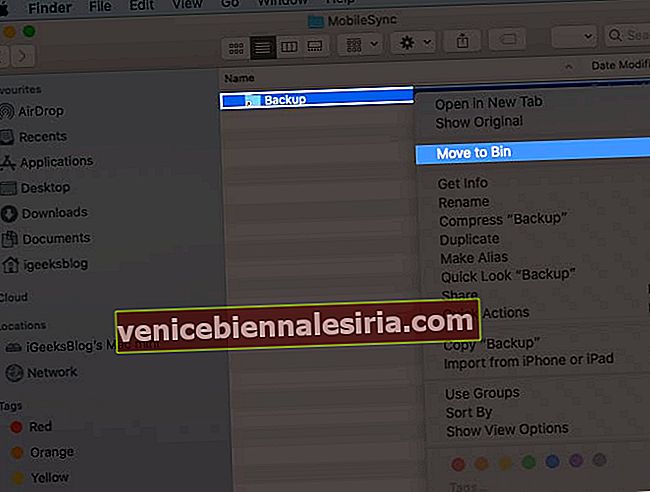
Now, for safety, drag (or copy-paste) the current Backup folder to this location. All future iPhone backups will be saved here, like before. Even if you do not follow this step, the next time you make the device backup, a new folder named Backup will automatically be created.

Do you not want to follow the lengthy process above? Well, here is the most straightforward way to change the iTunes/Finder iPhone backup location on Mac.
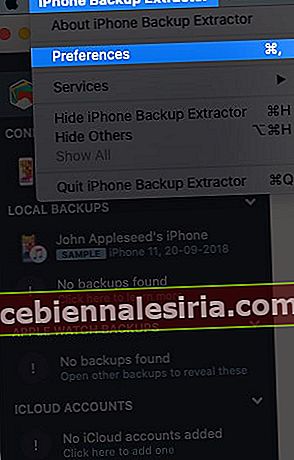
How to Change iTunes Backup Location Using iPhone Backup Extractor
Download iPhone Backup Extractor for free and complete the installation.Important: First time, you may have to open the System Preferences → Security & Privacy → Privacy tab → click on the padlockicon, and enter your Mac’s password. Now, click on Full Disk Access and then the plus sign (+). Next, select iPhone Backup Extractor and click Open.
Now come back to the iPhone Backup Extractor app window. (If needed, click on ‘OK, I’ve made this change, let’s restart the app to continue!’) From the top menu bar, click on iPhone Backup Extractor → Preferences → Backups → Change. Now, you may see a popup saying ‘Backup contains data.’ Click on ‘Open.’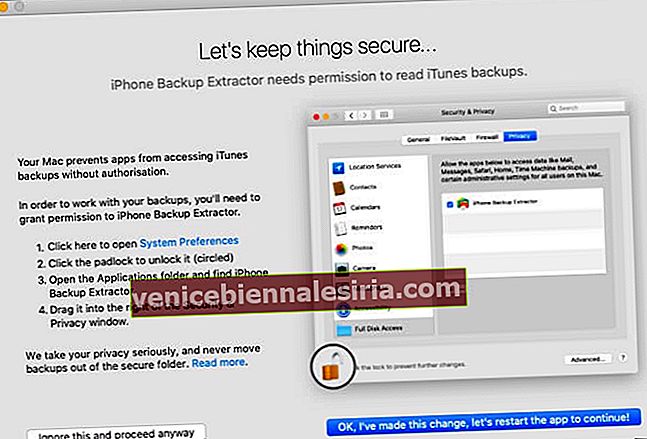
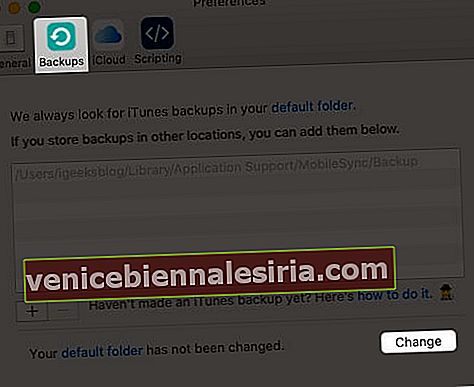
From here, drag the folder with a lengthy name like 149652….. to someplace else, like the Desktop.After that, inside the iPhone Backup Extractor app, click on Change and Select the desired folder.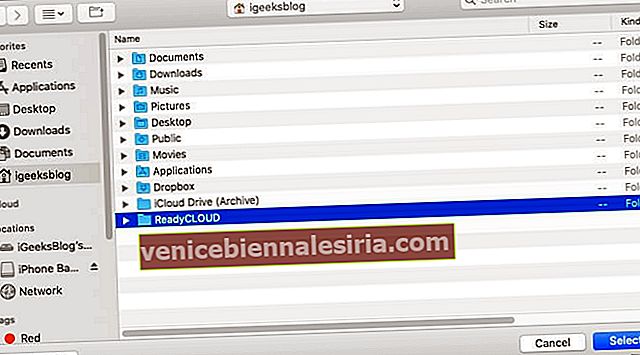


Done! You have successfully changed the iPhone backup folder in just a few steps. To undo this change, click on Revert.
Already Changed iTunes Backup Location But Unable to See the Backup?
Even after you have correctly followed the above steps and are unable to find the backup, then we have a separate guide that has you covered.
Most of the time, if you follow the first manual step, the problem arises due to the wrong location address of the new Backup folder. You must get that right. If this is wrong, go to ~/Library/Application Support/MobileSync and you will see a white Backup symlink instead of a blue folder named Backup with an arrow.
How to Change the iTunes Backup Location on Windows PC
As iTunes won’t let you change it, you need to make way through a symbolic link. Also known as a symlink, it’s a bridge that connects two folders with the same name. Using a symlink, you can direct iTunes to back up data to a dummy folder that you’ll have to create. However, you’ll have to enter some commands in the “Run As Administrator” window. Just make sure that you create a dummy folder in a drive with enough storage space. Like, we created it in D:\. Let’s get started by creating a folder first.
Create a folder named “MobileSync” in the D:\ (d stands for drive) on your computer.To view the by-default location, go to C:\Users\UserName\Apple\MobileSync if you have downloaded iTunes from Windows 10 Store. For the old desktop version, you need to go to C:\Users\UserName\AppData\Roaming\Apple Computer\MobileSyncCut and paste the Backup folder to the new MobileSync folder that you’ve created in D:\Now, run CMD as administrator. To do so, press Windows + R keys together, then type cmd in the search field.Press Ctrl + Shift + Enter to run it as in the administrator.Enter the command mentioned below.
If you’ve downloaded iTunes from the Microsoft store. MkLink /J “C:\Users\UserName\Apple\MobileSync\Backup” “D:\MobileSync\Backup
Enter this code MkLink /J “C:\Users\UserName\AppData\Roaming\Apple Computer\MobileSync\Backup” “D:\MobileSync\Backup” if using the older version.
Now when you back up your iPhone using iTunes, the data will be stored in the D:\MobileSync\Backup folder. Try backing up your iPhone and check if the Backup folder in the D:\ is configured correctly.
iPhone Backup Location Changed Successfully!
This is how you can have new iOS or iPadOS backups to a different location. Changing to some other folder on the same internal disk makes little sense. But doing the same on an external disk frees space on your internal disk.
I hope the above guide was helpful. In case you are facing difficulty at any step, feel free to reach us via the comments section below.
You may also like to read:
Find iPhone Backup Location on Mac and Windows PC3 Ways to Check Folder Size on MacHow to Use Control Center in macOS Big SurHow to Backup and Install iPhone Apps from Mac/Windows Without iTunes